Summary: Changing brake pads and discs is one of the most common DIY or garage jobs, yet it’s also the first thing that must be eliminated when an ABS warning light appears. Worn pads down to the metal, warped or thin discs, and debris from neglected brakes are responsible for a huge percentage of wheel-speed sensor faults and erratic hydraulic pressures that trigger ABS module error codes.
Still have an ABS light after new pads and discs? That’s when the fault is almost always inside the pump or module itself. We’re the UK’s largest ABS remanufacturer — explore our ABS repair services with lifetime warranty and 2–3 day turnaround.
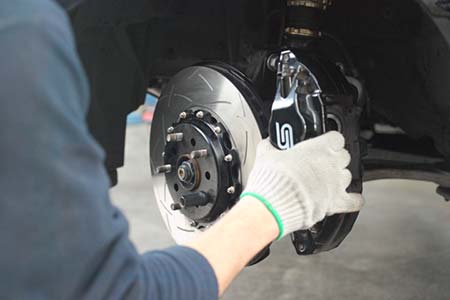
Changing Your Brake Pads & Discs
 If when driving along you hear an embarrassingly loud screeching noise when you press the brake pedal or have noticed reduced braking efficiency, it may be time to have your brakes checked and replaced.
Unsure if your brakes need changing? Be sure to check out this guide on brake wear indicators to help determine if your brakes need renewing.
All modern vehicles will have “Pads & Discs” as the braking equipment on the front wheels and most modern vehicles will have them on the rear wheels too. Pads & Discs will wear out gradually the more you use your vehicle and as they are common “Wear & Tear” parts, it is recommended to have them inspected on every service and replaced when they have worn out to the specified minimum level.
Did You Know: 9.6% Of All MOT Failures Are Because Of Braking Issues?
The braking system is one of the most important parts of a vehicle to ensure driver-safety and therefore is subject to a “Brake Test” at the time of an MOT. So if your vehicle is due an MOT, you can rest assured the efficiency of your vehicles braking system will be checked and any issues will be noted in the advisories section and explained to you.
Disclaimer
Brake pads and discs form part of the braking system of your vehicle and so are critical to ensuring your vehicle can stop safely. Incorrect fitment may lead to total brake failure. It is recommended that any work on the braking system is carried out with utmost care and by persons competent to do so. Safety glasses and protective gloves must be worn at all times.
Things You May Need Before Starting
Before you start, you should ensure you have the following items ready to complete the task of changing your brake pads and discs:
- New Brake Pads
- New Brake Discs
- Car Jack & Axle Stands
- Copper Grease
- Wire Brush & WD-40
- Wheel Locking Nut Key (If Applicable)
- Wheel Brace
- Hammer & Pry Bar
- Spanner & G-Clamp
- Tie Clips & Cutters
Step 1: Remove Your Wheel
Use the car jack to lift your vehicle until the wheels are off the ground. Be sure to place the jack at the correct car jacking points specified by the vehicle manufacturer. This information is available in your vehicle handbook and Haynes manual. Place the axle stands in a safe position in addition to the car jack for added safety. Using the wheel brace, loosen and remove the wheel nuts and then remove the wheel. If you have a locking wheel nut, use your wheel locking nut key with the wheel brace to loosen the locking nut.
Ensure the brakes have had time to cool down if the vehicle has just been driven as they can get very hot!
Tip: Before jacking the vehicle up off the ground, use your wheel brace and loosen each wheel nut on the wheel that you’re working on by 1-2 turns. DO NOT loosen them off fully – you only want to loosen them off 1-2 turns to make it easier when the wheels are jacked up.
Step 2: Remove Brake Caliper
Undo the caliper guide pin bolt to slide the caliper out. Sometimes they are not easy to slide out, in which case you may need to use a small pry bar. Remove the carrier and bolts fastening the caliper to the back of the hub and be sure to keep the caliper from hanging freely so you don’t put strain on the brake line.
Tip: Use tie clips to securely hang the caliper in a safe place i.e. the suspension leg.
Step 3: Remove Brake Disc
It’s common for the brake disc to be seized on the hub and it may need a little force to free up so you can remove it. With a hammer, go round the back of the disc and hammer it out away from the vehicle.
Tip: Check to see if your disc has a locating screw at the front holding it to the hub – if it does, be sure to remove this before going at it with a hammer.
Step 4: Install New Brake Disc
Slot the new brake disc on to the hub until it is all the way back. If your brake discs were designed to use a locating screw, be sure to re-install the locating screw as this will hold the disc in place as you continue with the installation.
Tip: Before you install the new brake disc, use a wire brush and some WD-40 to clean up any rust on the hub – this will help prevent future corrosion. Also, if your brake disc was not designed with a locating screw, you can secure it in place using a wheel nut whilst you continue with the installation.
Step 5: Install New Brake Pads & Caliper
 Re-install the caliper carrier to the hub and fit the new brake pads in the same way they came out. Use the copper grease on the ends and back of the pads but be careful not to get any grease on the brake discs or friction linings of the pad. Remove the brake fluid reservoir cap to ensure that any pressure build up has a way to escape before proceeding. Using the G-Clamp, slowly push the caliper piston back in so that it is flush with the caliper – this will help slide the caliper onto the new pads.
Once the caliper is back in place, refit the caliper bolts and ensure the brake disc moves freely without the brakes binding. Double check your work.
Tip: Always change brake pads in pairs (e.g. both front pads together and both rear pads together) to avoid uneven braking.
Step 6: Refit Wheel
Refit the wheel and tighten all the wheel nuts. The wheel will spin, not allowing you to fully tighten the nuts. Once the vehicle is lowered and the jack & axle stands are removed, tighten the wheel nuts fully.
Step 7: Test Brakes
Pump the brake pedal a few times to bring the pressure back to the brake pedal and ensure the brakes are binding. Check the brake fluid level in the reservoir, top-up if necessary, tighten the reservoir cap and pump the brake pedal a few more times to bring the brake pads up to the discs.
Winding Back Calipers On Modern Vehicles
Some modern vehicles require diagnostic equipment to be connected to effectively wind back the caliper pistons as a pose to using a G-Clamp. Be sure to check with our vehicles manufacturer before attempting to push the caliper piston in manually with a G-Clamp to avoid causing damage.
If you’re at all unsure or not confident in changing the brakes on your vehicle, don’t take chances with your brakes – Ask Sinspeed for a free estimate to replace the brake pads & discs for you!